To safely sharpen your pole saw chain at home, you need a round file, a flat file, a file guide, and a depth gauge tool. The process involves securing the saw, cleaning the chain, marking a starting tooth, and then carefully filing each cutter at the correct angle (typically 25-35 degrees) before adjusting the depth gauges. This maintenance restores cutting efficiency and enhances safety, preventing issues like kickback and operator fatigue.
Understanding Your Pole Saw Chain and Why Sharpening Matters
A pole saw chain consists of interconnected teeth, or “cutters,” each with a top plate cutting angle, a side plate cutting angle, and a depth gauge (raker). These components work together to efficiently cut wood. Over time, contact with wood, dirt, or small stones dulls these sharp edges, making the chain less effective.
Sharpening is essential for both performance and safety. A sharp chain cuts smoothly, producing clean sawdust, while a dull chain tears at the wood, creating fine dust and requiring more pressure. This increased effort leads to operator fatigue, higher fuel consumption for gas models, and potential damage to the saw’s engine or motor. Crucially, a dull chain significantly increases the risk of kickback, a violent backward thrust that can cause serious injury. Regular sharpening extends chain life, improves cutting efficiency, and enhances operational safety.
Essential Tools for Sharpening Your Pole Saw Chain
Gathering the right tools before you start will ensure a smoother and more efficient sharpening process.
- Round File: This is the most critical tool. Its diameter must precisely match your pole saw chain’s cutters, typically ranging from 5/32″ (4.0mm) to 3/16″ (4.8mm). Check your chain, guide bar, or owner’s manual for the exact size.
- Flat File (Depth Gauge File): Used to file down the depth gauges (rakers) after the cutters are sharpened, ensuring proper cutting depth.
- File Guide/Holder: This accessory attaches to your round file and helps maintain the correct filing angle (usually 25-35 degrees, as per your manual) and depth. It is highly recommended, especially for beginners, to ensure consistent sharpening.
- Depth Gauge Tool: A small metal template with a slot that helps you check and file depth gauges to the correct height.
- Chain Vise or Workbench Clamp: Essential for securely holding the pole saw’s guide bar and chain in place during sharpening, ensuring stability for accuracy and safety.
- Work Gloves: To protect your hands from sharp edges.
- Safety Glasses: To shield your eyes from metal filings and debris.
- Wire Brush or Old Toothbrush: For cleaning sawdust and debris from the chain before sharpening.
- Marker Pen: To mark the starting tooth, ensuring all cutters are sharpened without duplication.
“Using the correct file size and maintaining the prescribed sharpening angle are the two most critical factors for achieving a truly sharp and effective saw chain. Skipping these details can lead to an uneven cut and reduce your saw’s performance.” – John Miller, Arborist and Power Tool Specialist
Step-by-Step Guide to Sharpening Your Pole Saw Chain
Follow these steps carefully to achieve a uniformly sharp chain.
Step 1: Prepare Your Pole Saw for Sharpening
|
Our Picks for the Best Pole Saw in 2026
As an Amazon Associate I earn from qualifying purchases.
|
||
| Num | Product | Action |
|---|---|---|
| 1 | Electric 2-in-1 Cordless Pole Saw & 6" Chainsaw, Brushless Pruning Saw with 3.0Ah Battery, 15-Foot Reach Extendable Tree Trimmer for High Branch Pruning & Limb Cutting |

|
| 2 | SEESII 10-Inch 2-in-1 Cordless Pole Saw & Mini Chainsaw, 21V Battery Powered Brushless Electric Tree Trimmer with Extension Pole, 2×4000mAh Batteries, Automatic Oiling,Handheld Pruner |
|
| 3 | Greenworks 8-Inch 40V Pole Saw Attachment PS40A00 |
|
| 4 | Kerlista Replacement Pole saw Attachment compatible with Weed Eater Snapper dewalt Craftsman Ryobi John Deere Worx Troy-Bilt and Homelite multi-tool Hus 28LD Power head Black |
|
| 5 | Fiskars 15" Replacement Saw Blade, Woodzig Chainsaw Tooth, Compatible Models 9300/9261/TP45, Silver |
|
| 6 | Pole Saw Bag Compatible with Dewalt/Worx/Greenworks/EGO Power+/Black+Decker Electric Telescoping Chainsaw, Cordless Power Saw Storage Case for Extension Tree Trimmer Attachment, Black&Yellow |
|
| 7 | Pole Saw Attachment + Extension Pole Attachment Compatible with 125LDx 128DJx 128LDx 323LD 324LDx 325LDx 326LDx and 327LDx power head or trimmer head Silvery PA1100 575261201 |
|
| 8 | Kerlista Replace part Pole saw attachment + Extension Pole Attachment compatible with Hus 128LD most brushcutters head and Powerheads (Black) |
|
| 9 | 12-Inch Chain, Pole Saw Attachment - Compatible with Weed Eater Snapper Craftsman Ryobi WORX Troy-Bilt, and Homelite Multi-Tool Hus 128LD |
|
| 10 | 36FT Pole Saw, Telescoping Tree Trimmer with 7-30FT Extension Pole, Manual Branches Pruner for Backyard, Blue |
|
- Safety First: Ensure the pole saw is turned off and disconnected from its power source (unplug electric models, remove battery from cordless models, disconnect spark plug wire from gas models). Always wear work gloves and safety glasses.
- Clean the Chain: Use a wire brush or old toothbrush to thoroughly clean any sawdust, sap, or debris from the chain. A clean chain allows for better visibility and more accurate filing.
- Secure the Pole Saw: Securely clamp the pole saw’s guide bar in a chain vise or workbench clamp. The chain must be stable and unable to move while you work.
- Identify the Starting Tooth: Use a marker pen to mark one of the cutters. This helps you track which teeth you’ve sharpened, preventing you from missing any or sharpening any twice.
- Determine Filing Direction: Saw chains have alternating right-cutting and left-cutting cutters. Sharpen all cutters facing one direction first, then flip the saw (or move around it) and sharpen the other set.
Step 2: Sharpening the Cutters with a Round File
- Position the File: Place the correct size round file into the gullet (the space between the cutter and the depth gauge) of your marked tooth.
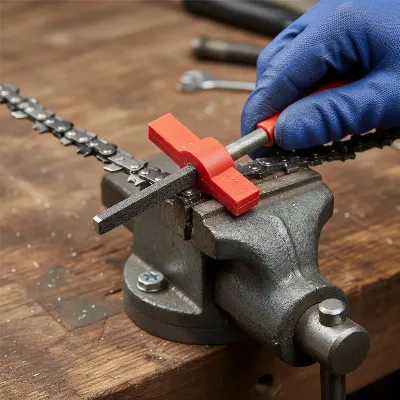 Close-up of a hand using a round file with a guide to sharpen a pole saw chain tooth
 - Maintain the Correct Angle: If using a file guide, ensure it rests firmly on the top plate and depth gauge. Push the file at the correct angle (typically 25-35 degrees, as specified in your manual). This angle is crucial for the cutter’s efficiency. Many file guides have markings to help you achieve this.
- File with Even Strokes: Use smooth, firm, outward strokes away from your body. Lift the file slightly on the return stroke to prevent dulling its teeth. Apply consistent pressure.
- Count the Strokes: Perform 3-5 strokes on the first tooth. The goal is to remove any damage and achieve a sharp, shiny edge.
- Check for Consistency: Move to the next tooth that cuts in the same direction. Repeat the same number of strokes, ensuring each tooth receives uniform treatment. This maintains balance in the chain.
- Work Around the Chain: Continue sharpening all the teeth that cut in one direction until you reach your marked starting tooth.
- Flip and Repeat: Once all teeth facing one way are sharpened, unclamp, flip the saw, and re-clamp it. Then, sharpen all the teeth that face the opposite direction, again using the same number of strokes for consistency.
Step 3: Adjusting the Depth Gauges (Rakers)
After sharpening the cutters, the depth gauges will be relatively higher because the cutter teeth have become shorter. If not lowered, the chain will not cut efficiently.
- Place the Depth Gauge Tool: Position the depth gauge tool (raker gauge) over a sharpened cutter. The part of the depth gauge that needs to be filed down will protrude slightly through the slot in the tool.
- File Down the Raker: Using a flat file, carefully file down the protruding depth gauge until it’s flush with the depth gauge tool. File horizontally across the top of the raker.
- Maintain Rounded Edge: Some depth gauges have a slight curve at the front. After filing, gently round off the front edge of the depth gauge with a few light strokes of the flat file, ensuring a smooth transition into the wood.
- Repeat for All Rakers: Move around the entire chain, checking and filing down each depth gauge.
Step 4: Final Inspection and Maintenance
- Check for Sharpness: A properly sharpened tooth should have a sharp, clean edge that feels almost “catchy” when you lightly run your fingernail across it (be very careful!). There should be no shiny spots left on the modern.
- Clean and Lubricate: Use a wire brush to remove any remaining metal filings. Then, apply chain oil to lubricate the chain before reassembling or using the pole saw.
- Test Cut: Before tackling a large project, make a test cut on a small piece of wood. A properly sharpened chain should cut smoothly and produce consistent, clean sawdust chips.
Important Safety Precautions When Sharpening
Sharpening a pole saw chain involves working with sharp edges and power tools. Always prioritize safety.
- Always Disconnect Power: Ensure the saw is completely de-energized before touching the chain.
- Wear PPE: Eye protection and heavy-duty gloves are non-negotiable.
- Stable Work Surface: A securely clamped guide bar prevents accidental slips and injuries.
- Correct File Size: Using the wrong file size can damage the chain and make it harder to sharpen correctly.
- Avoid Over-Filing: Each sharpening removes a small amount of metal. Over-filing shortens the life of your chain. Aim for minimal material removal to achieve sharpness.
- Don’t Rush: Take your time. Precision is more important than speed.
- Read Your Manual: Always consult your pole saw’s owner’s manual for specific chain and sharpening specifications, as designs can vary.
Conclusion
A sharp pole saw chain is the cornerstone of efficient and safe tree trimming. By understanding the basics of chain design, equipping yourself with the right tools, and meticulously following the sharpening steps, you can confidently restore your pole saw’s cutting performance at home. Regular maintenance, including sharpening and proper depth gauge adjustment, not only prolongs the life of your chain but also dramatically improves your cutting experience, making garden tasks less strenuous and significantly safer. Don’t let a dull blade slow you down or compromise your safety. Embrace the power of a perfectly sharpened chain and enjoy cleaner cuts and a healthier garden. What’s the most challenging pruning task you’re looking forward to tackling with your newly sharpened pole saw?
Frequently Asked Questions
How often should I sharpen my pole saw chain?
The frequency depends on usage and what you’re cutting. Generally, sharpen your chain after every few hours of cutting, or immediately if you hit dirt, rocks, or notice the saw producing fine dust instead of chips, or requiring more force to cut.
Can I sharpen a pole saw chain with a Dremel or grinding tool?
While possible, it’s generally not recommended for home users. Dremels or grinding tools can easily overheat the chain, causing it to lose its temper (hardness) and become brittle. They also make it harder to maintain consistent angles and depths, which is crucial for balanced cutting. Manual filing is safer and more precise for most DIYers.
What happens if I don’t adjust the depth gauges?
If the depth gauges (rakers) are too high after sharpening the cutters, the cutters won’t be able to penetrate the wood deeply enough. This results in the chain “skating” over the wood, inefficient cutting, excessive vibration, and a dull feeling, even if the cutter teeth themselves are sharp.
How do I know when my pole saw chain is beyond sharpening?
A chain is typically worn out when the cutter teeth are too short to effectively grab the wood, or when the entire chain (rivets, links) becomes loose or damaged beyond repair. If the wear marks on the top plate are almost gone, or if you’ve sharpened it so many times that the cutters are tiny nubs, it’s time for a replacement.
Can I sharpen a bent or damaged chain?
No. If the chain is bent, cracked, or severely damaged (e.g., from hitting metal), it’s unsafe to use or sharpen. Replace a damaged chain immediately to prevent serious injury and further damage to your pole saw.
How to Safely Sharpen Your Pole Saw Chain
This guide provides step-by-step instructions to safely sharpen your pole saw chain at home, restoring its cutting performance and ensuring safer operation.
First, ensure the pole saw is turned off and disconnected from its power source. Wear safety glasses and work gloves. Clean the chain thoroughly with a wire brush to remove debris, then securely clamp the guide bar in a vise. Mark a starting tooth with a marker pen to keep track of your progress.
Position the correct size round file in the gullet of your marked tooth, using a file guide to maintain the correct 25-35 degree angle. Use 3-5 smooth, firm, outward strokes, lifting the file on the return. Repeat for all teeth cutting in one direction, then flip the saw and sharpen the remaining teeth.
After sharpening the cutters, use a depth gauge tool to identify protruding rakers. With a flat file, carefully file down each depth gauge until it's flush with the tool. Gently round off the front edge of the raker with a few light strokes to ensure a smooth transition into the wood.
Check each tooth for a sharp, clean edge by lightly running your fingernail across it. Use a wire brush to remove any metal filings, then lubricate the chain with chain oil. Finally, make a test cut on a small piece of wood to ensure the chain cuts smoothly and produces consistent sawdust chips.

I appreciated the detailed explanation of the tools needed, especially the file guide. I didn’t realize how important it was to maintain that 25-35 degree angle. It took a bit of practice to get the hang of it, but my chain is definitely sharper than it’s been in a long time. Great advice for home users.
This was exactly what I needed! I was experiencing a lot of operator fatigue and kickback, and I suspected my chain was dull. Following these steps, especially cleaning the chain thoroughly first, made a huge difference. My pole saw is performing like new, and I feel much more confident using it.
I always put off sharpening my pole saw because it seemed like such a hassle, but this guide made it so clear. The tip about marking a starting tooth was a game-changer for me; I used to lose my place all the time. My saw cuts through branches like butter again, and it feels much safer to use now.
The steps were easy to follow, and I finally got around to sharpening my old chain. However, I found it a bit tricky to adjust the depth gauges precisely without a dedicated vise for the saw itself. It would have been helpful to have a recommendation for a good, affordable vise to secure the saw better during the process.